Pages

Wednesday, April 27, 2011

Spiced Pecans


Darn you, discounted Easter candy and your allure!
You are evil. 

The 2 (almost empty) family sized bags of mini eggs on my dining room table are proof.
Proof that discounted candy tastes much better than full price candy.
Also proof that I lack complete self control when it comes to a) sales, b) candy, and c) eating candy that was on sale.
And by the way, 'family sized' really means 'Jesse sized'.


This morning my husband asked me to make him mini egg pancakes and I was like, 'That's gross. Mini eggs are gross'. 
I had to lie.
I didn't want to share my precious egg stash. 
I actually think mini egg pancakes are a pretty fantastic idea and I'm jealous I didn't think of it first.


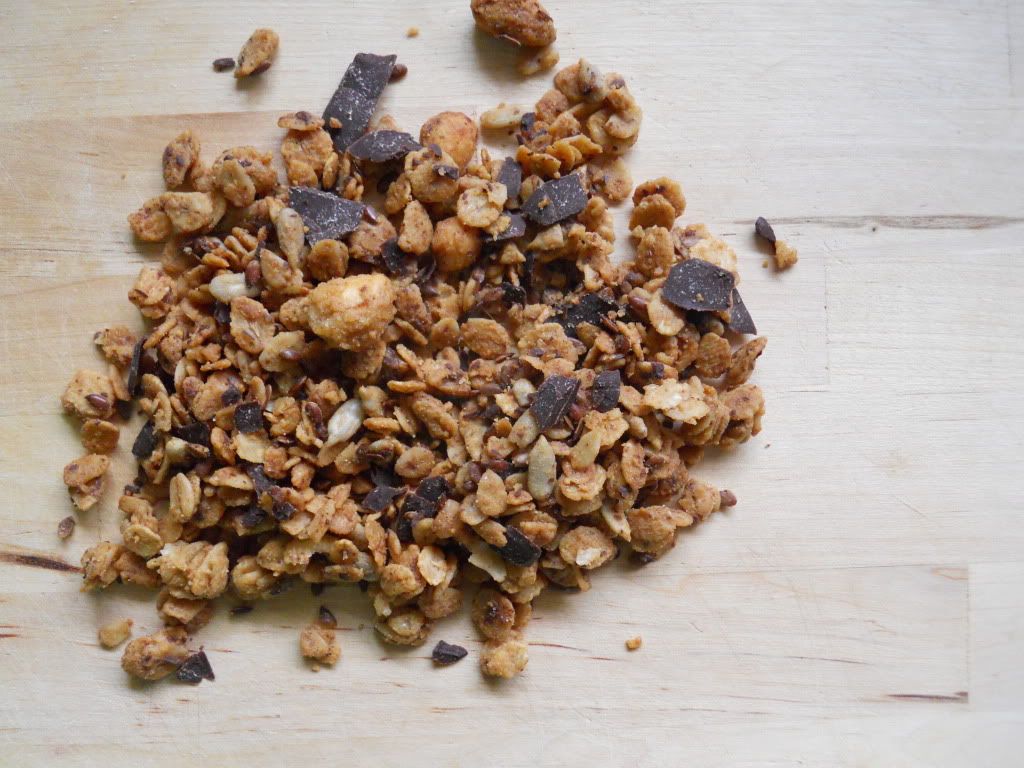
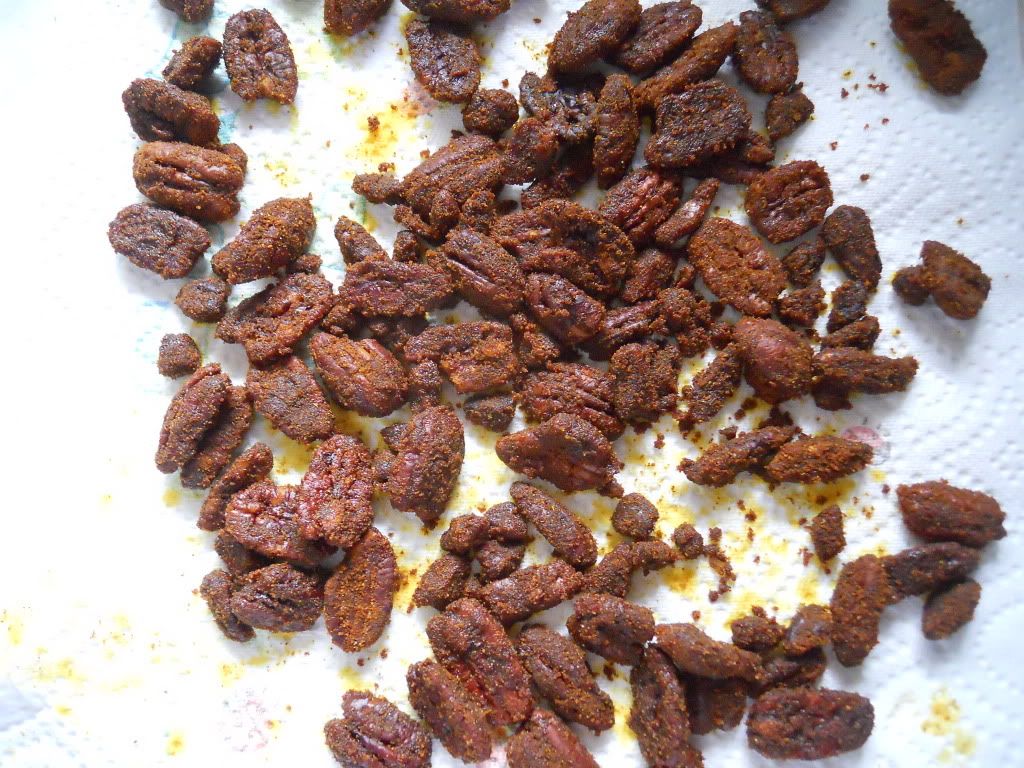
Another great idea (I also didn't think up) is these pecans. 
Salty, sweet and spicy.
They're a big blast of flavor in your mouth.
They're definitely not gonna rock your world like a bag of mini eggs stuffed into some pancakes but they do jazz up a salad and make a pretty tasty snack.

I know. I know.
I was just talking about mini eggs and now you're craving some and all I'm leaving you with is a recipe for pecans. 
That's tough. I'm mean. I'm sorry. Try the pecans.


Spiced Pecan
Makes 1 cup
Adapted from : Urban Pantry 

2 tbsp + 4 tbsp brown sugar
1 tsp cinnamon 
½ tsp cayenne
1 tsp turmeric
1 tsp paprika
½ tsp nutmeg
1 tsp salt
¼ cup peanut oil
1 cup whole pecans

Directions:
1. In a medium bowl combine 2 tbsp brown sugar, cinnamon, cayenne, turmeric, paprika, nutmeg and salt. Set aside.
2. Cover the bottom of a large sauté pan with the peanut oil and heat on medium high. When oil begins to ripple add pecans - stir frequently so they don't burn. 
3. When pecans start to smoke add 4 tbsp of brown sugar and toss, toss, toss so the sugar doesn't burn. Once the sugar is dissolved, remove the pecans with a slotted spoon and add them to the measured out spices. Working quickly, stir to combine. When mixture has cooled enough to taste, adjust spices to your liking. Pour on a pan to cool completely. Store sealed at room temperature.

Monday, April 25, 2011

Energy Bites


I like things that are easy to make, use simple ingredients and take almost no time.
Who doesn't?


If a recipe is healthy to boot and can fit in the busy hands of a one year old, you can be sure I'll be wasting no time in making it.


Like these little energy bites.
I can't tell you enough how much I love the simplicity of them.

They're customizable, using whatever might be in your cupboard.
They take less than 10 minutes to throw together, they're portable, they don't contain filler or mystery ingredients, and they're just plain tasty....

I want to marry them. 
I wonder if John would mind.


Make these, and you'll see what I mean.
Energy Bites
Makes 12 - 16 bites
Adapted from The Cilantropist  (originally from A Hungry Spoon)

¾ cup nut butter (peanut butter, almond butter, tahini, etc)
¾ cup rolled oats
¼ cup toasted seeds (sunflower, sesame, pumpkin, etc)
½ cup dried fruit, roughly chopped (apricots, cranberries, cherries, etc)
2 tbsp ground flaxseed
½ tsp kosher salt
1 tbsp honey
1/2 tsp vanilla

Directions:
1. Mix all ingredients together in a bowl. Make sure to evenly distribute everything. Take some of the 'dough' and press it between your hands if it sticks together it's ready- if not, add a bit more nut butter. Likewise, if it feels too wet add some more oats or flax.
2. To form the dough into a small bite, use a spoon or a cookie scoop to portion out the dough, squeeze it between your hands, and then gently roll it into a ball.  This amount of dough makes 12 bites that are about 2 inches in diameter.  Store the bites in an airtight container, and keep them refrigerated until eating.  Bites will keep for 1-2 weeks refrigerated.

Thursday, April 21, 2011

Whole Wheat Pitas


If you're celebrating Passover this week and doing the whole flour-free thing, I apologize for tempting you with this.


I realize it's cruel to dangle this soft, flavorful homemade pita in front of your eyes when you're probably eating something made with matzo meal. (I haven't actually tried anything made with matzo so please forgive my ignorance if it's actually super delicious.)


When the Feast of Unleavened Bread is over, I encourage everyone to try making their own pitas.

You'll never ever go back to store bought ones.
If you do, you'll feel completely disappointed with yourself.
Unless, of course, you're in a rush and just don't have the time, then it's okay.... you don't have to feel disappointed.


Try making these today.... or next week if you must. 

Just be careful when sticking your head in the 500 degree oven, you're mascara might want to melt to your eyeballs. For the ultimate protection, break out your safety goggles... or just improvise with a nice pair of shades ;)


Whole Wheat Pitas
Makes: 8

2¼ tsp active dry yeast
1 tbsp honey
1¼ cups warm water (105°F - 115°F)
1½ cups bread flour or high-gluten flour, plus additional for kneading
1½ cups whole wheat flour
¼ cup extra-virgin olive oil
1 tsp salt
cornmeal for sprinkling baking sheets
Directions:
1. In the bowl of a stand mixer, combine the yeast, honey and ½ cup of the water.  Stir gently to blend.  Whisk ¼ cup of the bread flour and ¼ cup of the whole wheat flour into the yeast mixture until smooth.  Cover the bowl with plastic wrap and set aside until doubled in bulk and bubbly, about 45 minutes.
 2. Remove the plastic wrap and return the bowl to the mixer stand, fitted with the dough hook.  Add in the remaining ¾ cup of warm water, 1¼ cups bread flour, 1¼ cups whole wheat flour, olive oil and salt.  Knead on low speed until the dough is smooth and elastic, about 8 minutes.  Transfer the ball of dough to a lightly oiled bowl, turning once to coat, and let rise in a warm draft-free place, about 1 hour, until doubled in bulk.
3. Place an oven rack in the middle position.  Place a baking stone in the oven (if using) and preheat to 500˚ F.
4. Once the dough has risen, transfer to a lightly floured work surface, punch down the dough and divide into 8 equal pieces.  Form each piece into a ball.  Flatten one ball at a time into a disk, then roll out into a 6½-7 inch circle.  Transfer the rounds to a baking sheet or other work surface lightly sprinkled with cornmeal.  Once all the rounds have been shaped, loosely cover with clean kitchen towels.  Let stand at room temperature for 30 minutes, until slightly puffy.
5. Transfer 4 pitas, 1 at a time, onto the baking surface.  (Note: These can be baked on a baking stone or directly on the oven racks.  I use a pizza stone, but either method is fine.) Bake 2 minutes, until puffed and pale golden.  Gently flip the pitas over using tongs and bake 1 minute more.  Transfer to a cooling rack and let cool completely.  Repeat with the remaining pitas.  Store in an airtight container for up to 3 days.

Tuesday, April 19, 2011

Easy Cheesy Whole Wheat Crackers


Are you a cracker snacker?
I am.
I'm a cheese and cracker snacker.


I can and will never turn down a hunk of gouda, or cheddar, or gruyere on a nice sturdy cracker.


Sometimes I even smear cheese whiz on my saltines.
If I'm feeling really fancy I slather on the cream cheese.

Please don't judge me.


It's only natural that my love for cheese and crackers has morphed into a cheese cracker. 

I'm not sure how the whole wheat flour made it in these but I'll allow it. 
Only this time though.
(Oh, and that other time, too.)

These make for a nice lazy snack because I don't need to go to all the work of slicing cheese to top the cracker since the cheese is in (and on) the cracker, already.  


Cheese, crackers and lazy... count me in.

Easy Cheesy Whole Wheat Crackers
Makes about 60
Adapted from How Sweet Eats

1¾ cups whole wheat flour (I used spelt)
½ tsp baking soda
¼ tsp salt
¼ cup olive oil
½ cup + 2 tbsp warm water
¼ cup white cheddar, shredded very finely
parmesan, pepper and coarse salt for sprinkling

Directions:
1. Preheat oven to 400°F. Mix together dry ingredients, add white cheddar, olive oil and ½ cup warm water. Mix until a dough forms; add additional water if needed. 
2. Spray a baking sheet with oil and lightly flour or flour a non stick silicone mat. Put dough on the baking sheet (or silicone mat) and roll out as thinly as you can. Use a pizza cutter to cut squares in the dough (careful if you're using the silicone mat). 
3. Sprinkle the dough with parmesan, freshly ground black pepper and coarse salt. As the squares bake they will separate into crackers. Bake for about 10 minutes or until golden and crispy.

Friday, April 15, 2011

Strawberry Salsa


The grocery stores are teeming with ripe, juicy strawberries.
They've been practically jumping into my cart every time I run in for a jug of milk. 
(Which, believe me, is a lot more than the average person.)


Consequently, we've been eating strawberries in any and all forms. 
On brownies, on pavlova, dipped in whip cream, chocolate sauce and caramel sauce, added to spinach salad and of course eaten straight up.

Hmm... white pants and strawberries might not be a good choice.

My favorite strawberry recipe (so far) has been this salsa. I love the combination of sweet, salty, and tart. It's like a little fiesta going on inside of your mouth. 


We ate this on top of baked salmon for an extraordinary dinner. As long as strawberries are in season I'm going to keep this on hand for an easy, healthy snack alongside pita chips.
Yum!

Strawberry Salsa
Makes: about 3 cups
Adapted from: Annie's Eats

2 cups fresh strawberries, rinsed, hulled and diced
1 cup cherry tomatoes, quartered
2 green onions thinly sliced
1 tsp fresh parsley, minced
1 tbsp balsamic vinegar
1 tsp fresh lemon juice
1 tsp olive oil 
1 tsp honey
salt and pepper, to taste

Note: A nice variation would be swapping the parsley for cilantro, and the lemon for lime juice and adding a bit of jalapeno for spice.

Directions:
1. Combine the all the ingredients in a medium bowl. Mix well, cover and refrigerate for about 1/2 hour to allow flavors to meld. Serve on salmon or with pita chips.

Linked to: April in the Raw

Wednesday, April 13, 2011

Cookies and Cream Square


We're gonna make some magic with 3 simple ingredients.
Oreos, butter, marshmallows.
Oh yeah, you know what we're gonna do.


Marshmallow meet Oreo.
Oreo meet Marshmallow.
You two are going to make some beautiful babies.


If this marriage doesn't sound like heaven to you, you need to walk away, walk away right now and don't come back until you've thought long and hard about what's really important in this life.


I made up a batch of these babies for my lil' bro and my hubby.
Then all this chewy goodness went straight in my belly.

When you make something for someone you don't have to actually give it to them.
It's the thought that counts, right? 
That's a good rule. 
Feel free to use it. 


You can thank me while you're eating chunks of this scrumdillyumcious no-bake bar and thinking about who would love them.

Cookies and Cream Square
Makes about 15 bars

1 box (350g) Oreo Cookies
¼ cup Butter
5 cups Large Marshmallows

Directions:
1. Place Oreos in a food processor and pulse until ground. 
2.Melt together marshmallows and butter in the microwave until puffed and melty, about 1 ½ to 2 minutes. Add ground Oreos to the marshmallows and stir until combined. Pour into a greased 8'' x 8'' square baking dish and smooth out the top. Refrigerate for about 30 minutes or until firm. Cut into bars. 

Monday, April 11, 2011

Peanut Butter and Chocolate Granola


Chocolate in your breakfast cereal?
Uh...yes, please!


If you need me to help you justify this whole chocolate and peanut butter thing for breakfast (again), we can talk about the protein in peanut butter or how dark chocolate is rich in antioxidants but...... we should definitely avoid the chat about fat content.
We can still talk fiber, though.
'Cause it is there.... along with some energy boosting sunflower seeds.


Are you okay with it now?
Have I talked you into it?
Eating this dessert-worthy granola on top of your yogurt for breakfast?


I bet you haven't even heard (or read) what I've said about how nourishing this is going to be. You just saw peanut butter and chocolate granola and headed right for the recipe.

I don't blame you.
I shall celebrate your love for chocolate and peanut butter by eating another bowlful myself.

Peanut Butter and Chocolate Granola
Makes about 1lb
Adapted from Eat Live Run

¼ cup canola oil
⅓ cup maple syrup
½ cup natural peanut butter
1 tsp salt (I like the sweet/salty combo but if you don't like that reduce the salt by half)
1 tsp cinnamon
4 cups old fashioned oats 
¼ cup ground flaxseed
½ cup sunflower seeds
½ cup dry roasted peanuts (if using honey roasted reduce the maple sugar to ¼ cup)
⅔ cup chopped dark chocolate (or chocolate chips)

Direction:
1. Preheat oven to 275°F. Bring the canola oil, maple syrup, peanut butter, salt and cinnamon to a simmer on the stove. Cook for 3 to 5 minutes.
2. While that's cooking. mix together the oats, flax, sunflower seeds and peanuts. Pour hot syrup mixture over the oats and toss well to coat. Spread the granola out on 2 lined baking sheets and bake for 40 minutes, stirring occasionally. 
3. Cool granola completely before stirring in the chocolate. Store in an airtight container.

Friday, April 8, 2011

Sunflower Cookies


I thought you might need a little sunshine to start your day off.

Since the skies don't seem to agree with me, I baked a cookie full of sunshine for you.
Just please don't walk on them.
(I'm walkin' on sunshine, yeah, yeah)

These make me smile : chocolate covered sunflower seeds.

These cookies should really brighten your day. 
They have a good helping of sun butter and a sprinkle of these cheery little chocolate covered sunflower seeds.

What? I have big 'sprinkles'

They remind me a bit of a peanut butter cookie that's been bathed in sunlight and spring time happiness :)

If that's your thing, peanut butter and happiness, go on and eat up these little rays of sunshine.


Happy Spring!
Sunflower Cookies
Makes: 18 large cookies
Source: Eat Live Run

½ cup butter, softened
1 cup packed brown sugar
1 egg
1 tsp vanilla extract
1 ¼ cups sunflower seed butter (available in most health food stores)
1 ¾ cups flour
1 tsp baking powder
½ tsp kosher salt
½ cup chocolate covered sunflower seeds (or chocolate chips)
Note: Our local grocery store carries these chocolate covered sunflower seeds made by Spitz

Directions:
1. Preheat oven to 350°F. Cream together butter and sugar until light and fluffy. Add the sunflower seed butter and mix well. Add the egg and vanilla extract and beat until smooth.
2. Combine the flour, baking powder and salt and add to the wet ingredients beat until it just comes together. Mix in the chocolate covered sunflower seeds.
3. Form cookies into small balls and press down gently on a lined baking sheet. Bake for 12 - 15minutes or until golden and puffy.

Wednesday, April 6, 2011

Spiced Hummus


Hummus is a great snack. It's easy to make and packs a huge protein punch.
I like mine with cilantro, cumin and a touch of ginger to give it heaps of flavor. 
(I say that, but it was initially a way to disguise some wilty cilantro.)


Make a batch and keep it in your fridge for a healthy snack with fresh vegetables or whole wheat pita.


Spiced Hummus
Makes: about 2 cups
Adapted from Martha

1 can (15oz) chickpeas, drained with ¼ cup liquid reserved
¼ cup tahini
¼ cup fresh lemon juice
4 tbsp extra virgin olive oil
1 garlic clove
¼ tsp ground ginger
½ tsp cumin
¼ cup cliantro leaves
freshly ground pepper
coarse salt

Directions:
1. In a food processor combine chickpeas, tahini, lemon juice, 3 tbsp olive oil, garlic, cumin, cilantro and salt and pepper. Puree until smooth. Taste and add salt and pepper if necessary.
2. Transfer to a serving bowl and drizzle with remaining olive oil and a sprinkle of pepper.

Monday, April 4, 2011

Easy Caramel Sauce


A few nights ago I made dinner for my mother-in-law and my mother.
(John and the baby were there too but they don't count.)


For some reason it didn't occur to me to make a dessert until the last minute.
I'm not sure why since dessert is my favorite part of dinner, duh!?

After taking a quick look in my fridge and seeing 3(!) different varieties of apples I was inspired to make a caramel dip. 


This caramel was easy and quick to make, I think it took less than 10 minutes from start to finish. The sauce was delicious although I over cooked the sugar a touch so it tasted slightly like burnt sugar.
It was still good though and a winner with my mom and MIL.

I definitely recommend it for dipping apples, pouring on ice cream, adding to coffee or drinking straight from the jar.

Oh, and on a completely different note:


Look up cute in the dictionary and you'll find this face right here.

Easy Caramel Sauce
Makes: about 1 cup

1 cup sugar
6 tbsp butter
½ cup heavy cream

Directions:
1. First, make sure you have everything ready to go - the butter and cream right next to the pan, ready to put in. Caramel is a fast process that can't wait for hunting around for ingredients.
2. Heat sugar on moderately high heat in a heavy-bottomed 2-quart or 3-quart saucepan. As the sugar begins to melt, stir vigorously with a whisk or wooden spoon. As soon as the sugar comes to a boil, stop stirring. You can swirl the pan a bit if you want, from this point on. Note that this recipe works best if you are using a thick-bottomed pan. If you find that you end up burning some of the sugar before the rest of it is melted, the next time you attempt it, add a half cup of water to the sugar at the beginning of the process, this will help the sugar to cook more evenly, though it will take longer as the water will need to evaporate before the sugar will caramelize.
3. As soon as all of the sugar crystals have melted (the liquid sugar should be dark amber in color), immediately add the butter to the pan. Whisk until the butter has melted.
4. As soon as all of the sugar crystals have melted (the liquid sugar should be dark amber in color), immediately add the butter to the pan. Whisk until the butter has melted.
5. Whisk until caramel sauce is smooth. Let cool in the pan for a couple minutes, then pour into a glass mason jar and let sit to cool to room temperature. (Remember to use pot holders when handling the jar filled with hot caramel sauce.) Store in the refrigerator for up to 2 weeks. Warm before serving.

Friday, April 1, 2011

Oreo Cheesecake Cookie


I've been able to think of nothing else since I saw this recipe.
Seriously, who wouldn't be obsessed with making a recipe that has Oreo and cheesecake in the title? (Hannah - you know what I'm talking about!)


These weren't quite as cream cheesy as I'd hoped but they were still pretty darn delicious. Given that the dough is eggless, I had a really hard time not eating it by the spoonful. 
Actually, I sort of gave in and did eat it by the spoonful.


If you love Oreo's and cheesecake you might just want to drop everything and make these right now.


Oreo Cheesecake Cookies
Makes:
Slightly Adapted from Multiply Delicious

½ cup butter, softened
3 oz cream cheese, softened
1 cup granulated sugar
1 tsp vanilla extract
1 cup all purpose flour
½ cup mini chocolate chips
1 cup oreo cookie crumbs (about 8 cookies crushed up)

Directions:
1. Preheat oven to 375°F and line 2 baking sheets with parchment. Set aside.
2. In a large bowl, cream together butter and cream cheese using a hand mixer until well combined.
3. Add the sugar and vanilla and continue mixing until well combined. Add the flour and mix on low speed until incorporated. Stir in mini chocolate chips.
4. Scoop the dough into 1'' balls and roll in cookie crumbs until completely covered. Place the covered cookie dough balls on the baking sheets and bake for 12 - 15 minutes or until cookies are golden and slightly puffed.
5. Cool on the baking sheet before transferring to a cooling rack.

Linked to: Sweets for a Saturday
Related Posts Plugin for WordPress, Blogger...