Pages

Showing posts with label lunch. Show all posts

Monday, July 11, 2011

Summer Quinoa Salad


It seems that I have a crush on quinoa.
Breakfast Quinoa.
Crunchy Quinoa.
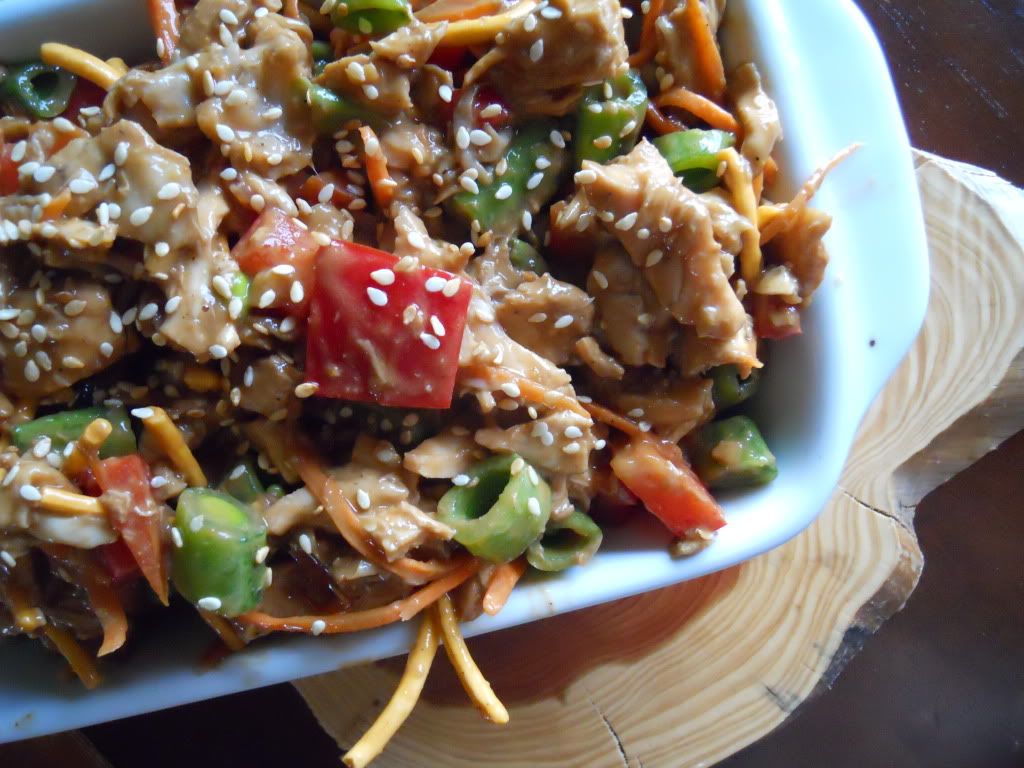
Mango Chicken Curry Quinoa Salad.

It's just fun to say: keen-wah, keen-wah, keen-wah, keen-wah, keen-wah...........keen-wah.

Actually, I like that it's so versatile.
You can eat it for breakfast, lunch, snack, dinner and even dessert.

Unlike a lot of other foods, I find the leftovers really easy to use up. You can throw leftover quinoa in soup, smoothies (yes, blended up!), chocolate cake (you heard me) and of course salad like, conveniently, the one I have right here.

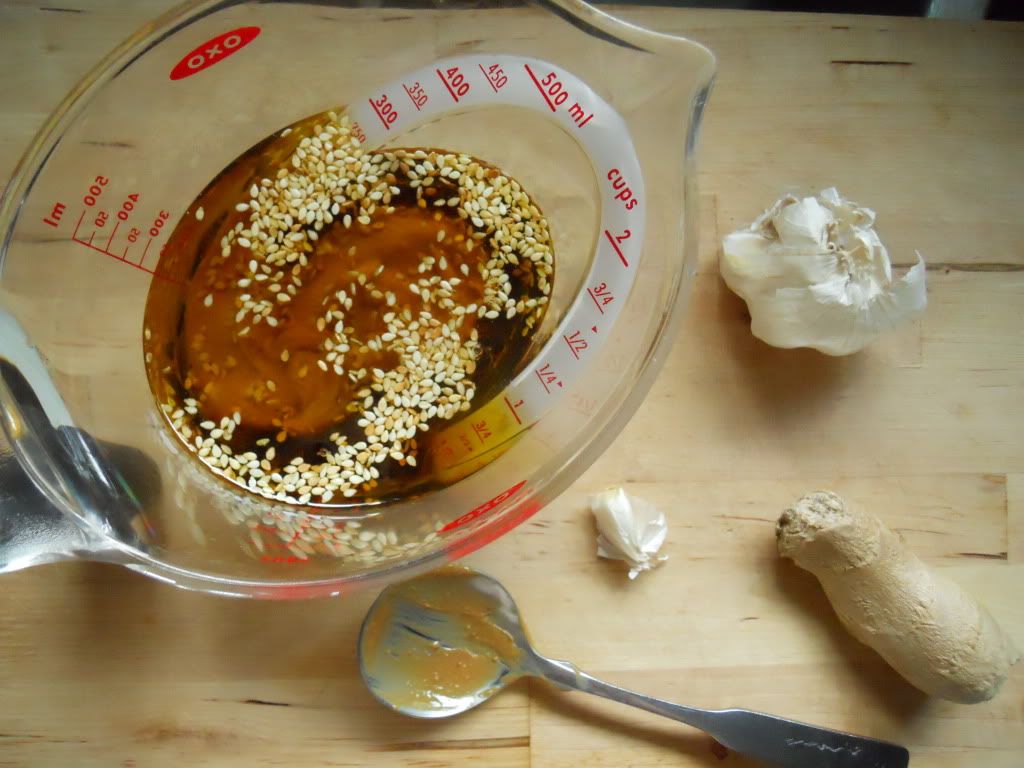
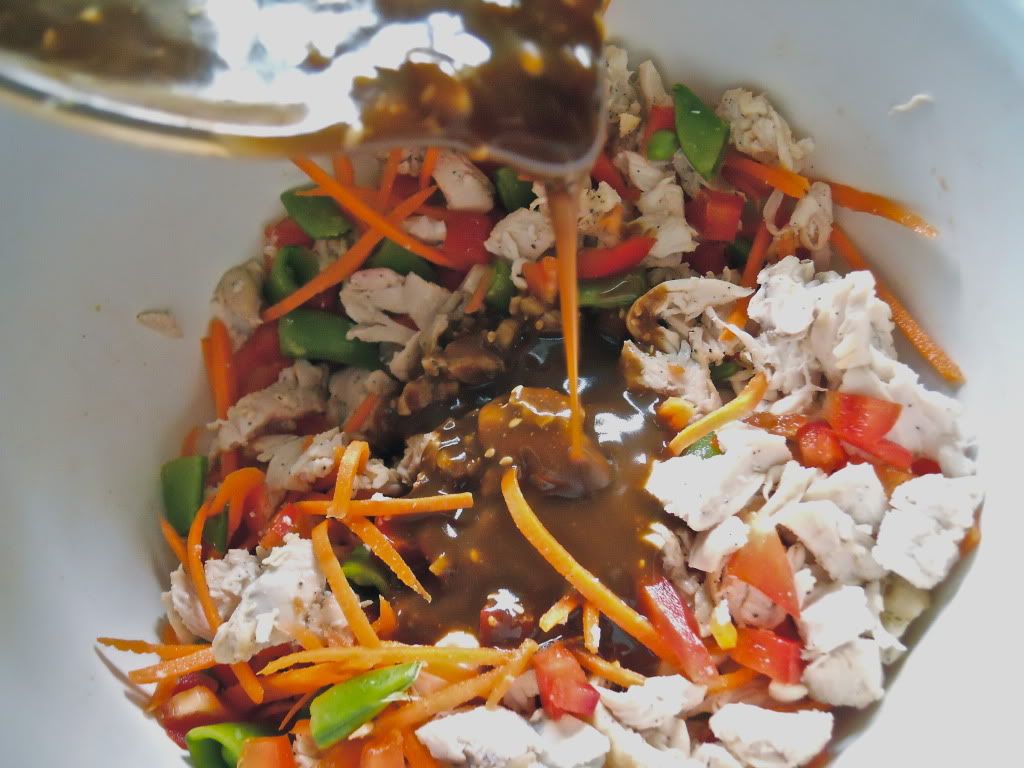
This salad is a mixture of chicken, raw veggies, quinoa and feta in a lemony vinaigrette. The recipe for the dressing is a bit rough so if you make it you'll have to adjust the ingredients to your liking.

Try it out and bring it to your next picnic.
Hope you like it.

Summer Quinoa Salad
Jesse's Kitchen Creation
Makes about 4 cups

For the salad:
2 cup cooked quinoa
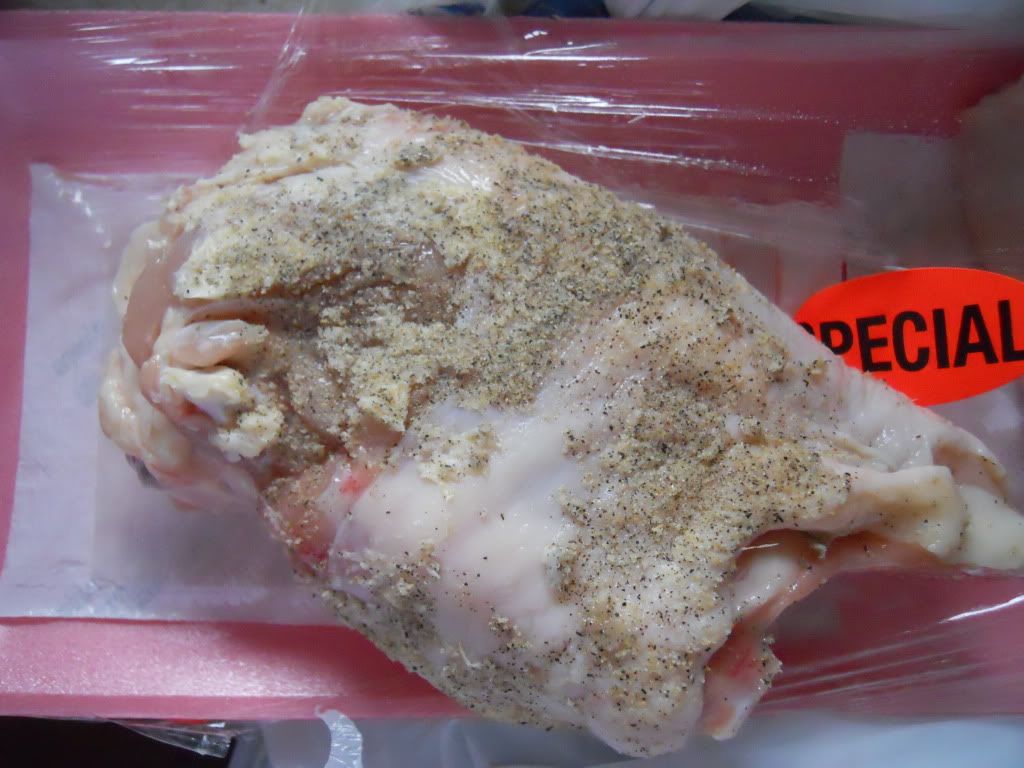
1 cup cooked chicken, shredded
½ head broccoli, diced
1 sweet red bell pepper, diced
¼ cup crumbled feta

For the dressing:
1 shallot, minced
1 tsp dijon mustard
1 tsp maple syrup 
3 tbsp fresh lemon juice
1 tbsp red wine vinegar
4 tbsp olive oil
1 tbsp minced parsley.
salt and pepper to taste

Directions:
1. In a large bowl combine together all the salad ingredients. In a small bowl whisk together dressing ingredients. Pour dressing over salad and toss to combine. Serve chilled. (Doesn't keep well).

Tuesday, July 5, 2011

Tomato Ricotta Tart


Sometimes when I cook I pretend I'm working in a restaurant being featured on Diners, Drive-Ins and Dives.


I show Guy Fieri how I make my signature dish from scratch.
Of course, I always make a point of telling him that I only use fresh, local ingredients and organic whenever possible. (Liar!!)

During the cooking process, he's constantly stealing bits of cheese and herbs to 'taste test'.


When the finished product comes out of the oven he raves about the complexity of flavors in my dish and then gives me a fist bump and a good work to end the show.

Like the show, my dishes are always delicious and unlike anything else he's ever tried at the one million other restaurants he's been to. (HA!)

Although that last statement is dripping with skepticism (or at least it was when I said it in my head), I do think this tart would meet that criteria.


It kind of reminds me of a quiche but without the eggy texture. It's really perfect for brunch or lunch and is packed with flavor which is a bit surprising given how few ingredients it uses. 


This tart will probably never make it's debut on Triple D.....
But it'll always be a star in my kitchen.

Tomato Ricotta Tart
Makes 1 x 9'' tart
Slightly Adapted from: Martha Stewart (who else?)


2 cups fresh bread crumbs
¼ cup olive oil plus more for brushing
1 cup ricotta cheese
2 eggs
2 tbsp chopped fresh herbs (basil, rosemary etc.)
¼ cup grated parmesan
salt and pepper
1 large tomato

Directions:

  1. Preheat oven to 450 degrees. In a 9-inch springform pan, toss breadcrumbs with olive oil; press evenly into bottom.
  2. In a bowl, whisk ricotta with Parmesan, eggs, and herbs; season generously with salt and pepper. Spread over crust; arrange tomatoes on top. Brush with olive oil.
  3. Bake until tomatoes are almost dry, 35 to 45 minutes; let cool. Unmold. Serve warm or at room temperature.

Wednesday, June 15, 2011

Chinese Chicken Salad


Occasionally I emerge from my sugar coma and I'm forced to make something other than cookies for dinner. It usually happens around the time that I'm looking in the fridge and realize I have a bunch of vegetables that are going to be compost if I don't eat them, and soon!


This event occurred yesterday. (Mark it on your calender.)


Sometime between my 12th Reese's Peanut Butter Cup and 27th maple glazed almond I spotted this recipe.


The shock that I had all the ingredients on hand to make this wonderful looking salad propelled me into motion. (Not to mention my secret love affair with chicken salad sans mayo.)


The results were spectacular and well worth setting aside the junk food for.
This salad is bursting with flavor and has lots of great texture and color.


Try it out for you next lunch, supper or picnic! 

Chinese Chicken Salad
Serves 6
Adapted from: A Farm Girl's Dabbles but originally from Barefoot Contessa Parties!

For the salad:
3 large chicken breasts
2 tbsp melted butter
salt and pepper

½ lb sugar snap peas, cut into 1'' pieces
2 sweet bell peppers (red, orange or green), cored and seeded and sliced into 1'' pieces
1 cup coarsely grated carrot
2 tbsp toasted sesame seeds
½ cup raw chow mein noodles

For the dressing:
⅓ cup extra virgin olive oil
⅛ cup apple cider vinegar
¼ cup soy sauce
2 tbsp sesame oil
1 tbsp honey
1 large garlic clove, minced
2 tsp fresh ginger, minced
¼ cup creamy natural peanut butter
½ tsp salt
½ tsp fresh ground pepper

Directions:
1. First, prepare chicken. Preheat oven to 350°F. Brush melted butter all over the chicken and season liberally with salt and pepper. Place on a foil lined sheet pan and roast for 35 - 40 minutes, until chicken is just cooked. Once chicken is completely cooled, use to forks to shred the chicken in bite sized pieces.
2. Combine the shredded chicken, snap peas, bell peppers, carrots and chow mein noodles in a large bowl.
3. Whisk together all the dressing ingredients and pour over the chicken and vegetables. Gently combine. Sprinkle the 2 tbsp of sesame seeds over the salad and season to taste. Serve cold or at room temperature.

Wednesday, May 18, 2011

Broccoli Cheddar Soup


I want to be one of those people that drink sangria on their decks in the evenings.
Preferably a fruity rosé with citrus undertones and a crisp afterbirth (The Office, anyone?)


The sad truth is I'm more of a sit on my couch with a bowl of soup and bread person. 
Light on the soup, heavy on the bread, please.
(Give mama some comfort food and don't skip on the carbs! That's all I'm sayin'.)


This broccoli and cheddar soup is the ultimate comfort food.
I made it yesterday while the heavens opened up and wept all over Revelstoke. 
Or less poetically, while it rained all day.

The aroma of cooked onions and simmering vegetables was heavenly. It only took a few minutes to prepare and I would say it rivals any restaurant soup of the same variety that I've ever had.


Give it go....or be a loser and drink your stupid sangria.

Broccoli Cheddar Soup
Adapted from the Food Network
Makes: 4 servings

6 tbsp butter
1 small onion, diced
¼ cup all purpose flour
2 cups whole milk
3 cup chicken or vegetable stock
2 bay leaves
⅛ tsp nutmeg
salt and pepper to taste
4 cups broccoli florets ( I used the stems too)
1 large carrot, peeled and diced
1½ cups grated sharp white or yellow cheddar plus more to garnish


Directions:
1. Melt the butter in a large Dutch oven or pot over medium heat. Add the onion and cook until tender, about 5 minutes. Whisk in the flour and cook until golden, 3 to 4 minutes, then gradually whisk in the half-and-half until smooth. Add the chicken broth, bay leaves and nutmeg, then season with salt and pepper and bring to a simmer. Reduce the heat to medium-low and cook, uncovered, until thickened, about 20 minutes.
2. Add the broccoli and carrot to the broth mixture and simmer until tender, about 20 minutes. Discard the bay leaves. Puree the soup in batches in a blender until smooth; you'll still have flecks of carrot and broccoli. Return to the pot. (Or puree the soup in the pot with an immersion blender.)
3. Add the cheese to the soup and whisk over medium heat until melted. Add up to 3/4 cup water if the soup is too thick. Ladle into bowls and garnish with cheese.

Friday, March 18, 2011

Crustless Broccoli and Cheddar Mini Quiche


I honor of St. Paddy's day (yesterday) I thought I better kick out something green for y'all.


It was between this broccoli, some spinach or the green eggs and ham in the back of the fridge.

The broccoli needed to be used up so it won. 
I'm not sure if being eaten is really 'winning' in the life of a vegetable but it's better than being tossed, right?


These are yummy and easy so they're a winner in my book. 
The muffin tin makes them the perfect size for little (and big) mouths. My one year old gobbled them up (probably because of the cheese). The few leftovers we did have I put in the freezer and they taste pretty good reheated.

Try them out for an easy breakfast or lunch.


Crustless Broccoli and Cheddar Mini Quiche
Makes: about 16
Adapted from Martha Stewart

1 pkg (10oz) broccoli florets
6 large eggs
½ cup whole milk
1 tsp dijon mustard
1 tsp freshly ground pepper
¾ cup shredded cheddar cheese

Directions:
1. Preheat oven to 350°F. Grease 16 holes in a standard muffin tin, set aside. Bring a pot of water to a boil. Add broccoli and cook for 1 minute. Drain well. Blot with paper towels to get out as much water as possible. Once cool enough to handle, coarsely chop.
2. In a large bowl whisk together eggs, milk, mustard and pepper. Stir in broccoli and cheese. Ladle broccoli mixture into muffin cups, dividing evenly. Bake for about 20 minutes or until the center of the quiche no longer jiggles. 

Wednesday, March 9, 2011

Cilantro Pesto Egg Salad


I'm not a huge lover of cilantro or egg salad.
Maybe this wasn't my best choice to make for lunch.
The cilantro made me do it.

A half batch of cilantro pesto being made

I had a big bunch of cilantro sitting in the fridge threatening to spoil and this seemed like a good enough way to use it up. 

Let me start my 'review' in saying this recipe didn't convert me to egg salad.
I'm still not fond of the stuff but I'll eat it if I must.


I was, however, pleased with the way the cilantro pesto turned out.
Generally, I find cilantro over powering and a bit of a steal the show herb.

This pesto really mellowed out the flavor.  I think it'd be good tossed with some hot pasta instead of the egg salad. I'm still struggling to think of how else I'd use this Mexican-Italian fusion pesto.

Any ideas out there?


Cilantro Pesto Egg Salad
Adapted from Mess in the Kitchen
Makes about 2 cups for 8 sandwiches  (don't hold me to that)

For the pesto:
70 grams cilantro
2 tbsp pinenuts or walnuts
2 tbsp parmesan cheese
1 small garlic clove, peeled
2 tbsp extra virgin olive oil 
salt and pepper to taste

For the egg salad:
6 hard boiled eggs, peeled and roughly chopped
½ cup low fat mayo (is there really such a thing?)
2 sticks of celery, chopped

16 slices crusty brown bread

Directions:
1. To make the pesto: combine all the ingredients (under pesto) in a food processor and process until smooth and creamy looking. Taste and add more salt and pepper depending on your liking.
2. In a medium sized bowl, mix together the chopped eggs, mayo and celery.
3. If desired toast the slices of brown bread. Spread about ¼ cup of egg salad on 8 slices of bread, top with the remaining slices and cut in triangles.

Friday, March 4, 2011

Vegan Cream of Mushroom Soup


I'm not even close to vegan.

I'm a bacon lovin', butter eatin', whip cream slurpin' omnivore.


I can't help it.
I just love that stuff.

But I do still like to mix it up once in awhile.
It's usually at the request of my arteries.


Truthfully, I really do try to prepare vegan or vegetarian meals at least one day a week (usually Meatless Monday's) for some variety.

When vegan recipes taste as good as this soup, I really don't miss the other stuff.


This soup subs cashew cream for the heavy cream that would normally be in the soup. Although it's not as rich and thick as regular cream, the cashew cream works really well to make this into a comfort food.


I know this is a bit weird and different but give it try. 
(Not ready to go vegan? Eat it with a huge slice of cheese toast on the side :) )

Vegan Cream of Mushroom Soup
Serves: 4
Source: Joy the Baker

2 tbsps olive oil
1 medium onion, diced
3 garlic cloves, minced
1 lb (454g) cremini mushrooms, cleaned and sliced
1 tbsp tamari (or soy sauce)
1 tbsp worcestershire sauce
1 tsp coarse ground pepper
3 cups vegetable broth (or 3 cups water plus 1 tbsp homemade bouillon)
salt 
½ cup raw cashews
½ cup water

Directions:
1. In a large pot heat olive oil over medium heat. Add onions and saute until translucent and slightly browned, about 5 minutes. Add garlic, stir and cook for 1 minute more. Add mushrooms, tamari (or soy sauce), and worcestershire and continue cooking until mushrooms or very soft and broken down, about 5 minutes. Add pepper and broth and simmer for about 10 minutes.
2. While soup is simmering, prepare cashew cream. In a blender or food processor, puree cashews and water until smooth. Pour into a small bowl and set aside. 
3. When mushrooms are cooked through add about ⅓ of the soup to the blender and blend on low until smooth. Pour into a clean pot and continue until you've pureed the whole batch of soup. Pour the cashew  cream into the soup and stir until incorporated. If desired, strain through a fine mesh strainer. (I didn't). Serve or freeze for later.

Linked to: Seasonal Sundays

Wednesday, February 23, 2011

Curried Apple Brie Flatbread


I'm sorry but I just don't like brie.
There are so many wonderful recipes out there for baked brie that I want to like but it doesn't seem to my thing.


I think it's the rind on the cheese that I can't stand. Isn't it some type of mold or something? (Clearly I'm not very savvy when it comes to cheese.) I guess I could cut the rind off but it seems like such a waste of money.... I'm not sure if I've ever mentioned this before but I'm extremely cheap and I hate food waste. 
Hate it. 
If you waste food you're not my friend.

Yeah, I took a few bites outta the bread.

A few weeks ago I forgot about my disdain for brie cheese and was somehow compelled to buy it. 
Weird, I know.

So here's a recipe that, I think, covers the unpleasantness of the cheese rind and transforms the brie into a tasty lunch, appie or snack.


(Don't think you need to stick to making this as a flatbread. This could be made as a pizza, a stuffed pita, a grilled cheese sandwich, or served on naan.)


Curried Apple Brie Flatbread
Serves 4
Adapted from Dinner with Julie

½ cup softened butter
3 tsp mild curry powder
1 flatbread (or naan, pitas, wrap, pizza crust)
6oz Canadian brie, thinly sliced while chilled, discard end pieces containing mostly rind
1 apple, thinly sliced
4 tbsp mango chutney

Directions:
1. Preheat oven to 450°F. In a small bowl mix together the curry powder and butter. Spread it on the top of flatbread. (Alternatively, you can brush the bread with olive oil and sprinkle on the curry powder.)
2. Arrange the apple slices on the flatbread. Top with the thin slices of brie. Scatter small dollops of the chutney all over. Bake for about 8 minutes or until the cheese is melted and bubbly.

Sunday, February 13, 2011

Pumpkin and Roasted Beet Soup


Everywhere I turn I see snotty noses and hear phlegmy coughs.
Is that happening where you are too?

It's an onslaught of germs and viruses out there.
Yucky, icky germs and what can you do about it?


I know what I'm gonna do about it.
I'm loading up on this warm, sippable, vitamin packed soup.
Not only is it good for you, it's just plain tasty.


Rich in zinc and vitamin C, pumpkin gives a major boost to the immune system helping fight off little germ intruders.

That's a fact. 
I know because I read it on the internet.


Germs, meet your match.

Pumpkin and Roasted Beet Soup
Adapted from Dinner with Julie
Serves 6

2 cups pumpkin puree (or any type of squash)
3 - 4 small beets topped trimmed
1 tbsp olive oil
1 medium onion, diced
2 garlic cloves, minced
1½ cups orange juice
4 cups chicken or vegetable stock
salt and pepper

sour cream or yogurt to serve (optional)

Directions:
1. Preheat oven to 450F. Wrap the beets individually in foil. Place the beets directly on the rack; roast for 30 minutes.
2. In a large pot, heat oil over med heat and saute onion for a few minutes, until it starts to soften. Add the garlic and pumpkin puree. When they're cool enough to handle, peel and chop the beets; add to the pot along with the orange juice and stock. Simmer for about half an hour.
3.Puree the soup with an immersion blender and season with salt and pepper to taste. Serve warm with a dollop of sour cream or yogurt.

Linked to: Seasonal Sundays

Monday, January 31, 2011

Spanakopita Wannabes


I love eating phyllo pastry, but I suck at using it.
It's so thin and delicate. I lack the skill to gracefully move it around and keep it in tact. 


So when I'm drowning in spinach and feta (ok, drowning is an over exaggeration) and I need to make some spanakopita, I cheat.

I try not to cheat too often in life. 
Or at least if I do I don't announce to the world. 
But in the realm of food, sometimes cheating just can't be avoided.


Hence, I swapped out the phyllo for pizza dough which techinically means these can't be spanakopita so they're wannabes.

All the flavor without the crispy, crunchy mess.

I got spinach everywhere.

Spanakopita Wannabes
Makes 4

2 eggs
1 pkg (10oz) fresh or frozen spinach, chopped
¾ cup crumbled feta cheese
2 garlic cloves, minced
¼ tsp pepper
1 tube (10oz) refrigerated pizza crust or make your own

Directions:
1. Preheat oven to 425 degrees. In a small bowl whisk eggs; reserve 1 tbsp of egg and set aside.
2.In a medium bowl, combine the spinach, feta, garlic, pepper and remaining egg.
3. Roll pizza dough into a 12'' square. Cut into 4 3'' squares. Top each square with about 1/3 cup of spinach mixture.
4. Fold each square into a triangle and pinch edges to seal. Cut slits in top and brush with reserved egg.
5. Place on a greased baking sheet. Bake for 8-10 minutes until golden.

Monday, November 29, 2010

Flour Tortillas


I just want to lay on my couch all afternoon eating cheese quesadillas and watching Desperate Housewives rereuns. Is that too much to ask?


Oh, and I want my quesadillas made with these flour tortillas, please. Thanks.


They're soooo much better than store bought ones. More work for sure but again, soooo much better. I just can't emphasize so enough.


These and cheese (hey! that rhymes) are my comfort food.


So if anyone needs me, you know where I'll be.


Homemade Flour Tortillas
Makes: about 16

2 ½ cups all purpose flour
2 ½ tsp baking powder
1 tsp kosher salt
½ cup + 2 tbsps lard or vegetable shortening
1 cup very hot water

Directions:

1. Combine flour, baking powder and salt in a large wooden bowl. Stir together.
2. Add spoonfuls of lard or shortening (use 1/2 cup PLUS 2 tablespoons), then use a pastry cutter to combine the ingredients. Cut mixture until it resembles coarse crumbs.
3. Slowly pour in hot water, stirring to bring mixture together. Lightly knead dough 30 to 40 times, or until it becomes a cohesive ball of dough and is less sticky. Cover with a tea towel and allow dough to rest for at least an hour.
4. Roll into ping pong size balls, place on a tray, cover with a tea towel, and allow to rest for another 20 to 30 minutes.
5. When you’re ready to make the tortillas, heat a dark or cast iron griddle to medium/medium-high heat. One by one, roll out balls of dough until very, very thin. Throw tortillas (one by one) onto the griddle. Cook on each side for 20 to 30 seconds, removing while tortillas are still soft but slightly brown in spots. Remove and stack tortillas, and cover with a towel to keep warm. Serve immediately or allow to cool before storing tortillas in a container. To warm, nuke tortillas in the microwave, or wrap in foil and warm in the oven.
Helpful tips:
* Make sure the water you pour in is very warm.
* Allow the dough to rest, both after kneading and after forming into balls.
* Roll out very thin.
* Get the heat right on your stove: Too hot, and the tortilla will burn in spots. Not hot enough, and the tortilla will begin to crisp before you can get it to brown. I get my stove between medium and medium high heat; that seems to do the trick.
* Use a dark griddle or cast iron skillet to brown the tortillas.
* Cook just long enough to lightly brown the tortilla in spots; don’t cook too long or tortillas will crisp. You want them to be soft and pliable when you serve them.
* Finally: Have fun! And enjoy them. They’re absolutely scrumptious.


Saturday, August 14, 2010

Mango Chicken Curry Quinoa Salad


This was insanely good. Looking at this photo, I probably wouldn't be too eager to make what looks like a bowl of orangey mush but please, please ignore the photo. It is really, really good. And easy. And healthy. And, if you are using leftover chicken and quinoa, quick.


Lately, I've been eating a lot of chicken salad. (I blame Slice of Feist for her yummy looking chicken curry salad back in June.) It's so refreshing on a hot day and an easy meal to prepare when you're cooking for one. I like this recipe in particular because there's no mayo (like more traditional recipes) and the vinegar and mango work together to create a really great sweet and sour taste.


I threw some pumpkin seeds in just for kicks and giggles (and because it's what I had) but I think some cashews or peanuts would taste pretty darn delicious in there. If you're making the chicken from scratch, use the leftover poaching liquid to cook the quinoa for some extra yummyness!


Chicken Curry Quinoa Salad (w/ mango)
Serves 2 (large portions)
(An Original Recipe)

For the dressing:
1 shallot, minced
3 tbsp olive oil
2 tbsp rice vinegar
½ tsp turmeric
1½ tbsp curry powder
1 tsp ground ginger
1 tbsp brown sugar
pinch of salt

For the salad:
2 cold cooked chicken breasts (poached or grilled)
1 cup cold cooked quinoa 
1 ripe mango
4 tbsp cashews (or whatever you want) optional
cilantro for garnish

Directions:
1. In a small bowl, whisk together dressing ingredients. Taste and correct seasoning.
2. Cut up chicken into small chunks. Cut up mango into small chunks.
3. Combine chicken, mango, quinoa, seeds (if using) and dressing. Stir together until everything is evenly coated. 
4. Garnish with cilantro and serve or cover and refrigerate.

Friday, August 6, 2010

Fridge Cleaner Grilled Calzone


So around 2:00pm yesterday I was feeling.... hmmmm...... what's the phrase?

Oh, I know

Tired and Uninspired

Ever since le bebe was born, food has become a bit of a chore. 

I've always wanted to eat but now I need to eat. Not only that, but I need to be careful what I eat, ugh.

So there I was, looking for something relatively healthy and quick and tasty and cheap and......preferably something that would make itself for lunch.

What to eat? What to eat? I had a little bit of sweet red pepper, half a shallot, some leftover pizza dough, a squishy tomato, about 1 tbsp of marinara sauce, couple slices of pineapple, fresh mozzarella and a few frozen bacon bits.


No problemo. I'll make a pizza.

Oh wait! It's 40 trillion degrees outside and I don't want to turn on the oven.


Enter my trusty George Foreman Lean Mean Grilling Machine.


Now, it's hard to tell from this photo but this lean mean fat reducing grilling machine is small. Much to small, in fact, to fit a whole pizza on it.

(Why didn't I use my bar-b-que I am only now asking myself?)


Hence, my vision of a pizza was folded into the reality of a calzone.

What can I say? Desperate times call for delicious measures :)


And this, was certainly delicious.


Related Posts Plugin for WordPress, Blogger...