Pages

Showing posts with label fruit. Show all posts

Sunday, January 2, 2011

Blackberry Bran Muffins


I like to keep bran muffins on hand for.... um...emergencies?


Have a baby, feed it too much cheese and then you'll know what kinda emergencies I'm talkin' about.
Or have a husband who....
nevermind.... 
I shouldn't talk about other people and their colon cleanses.

Emergencies aside, did you know you should have a least 30g of fiber a day?!?
 That, my friend, is the only way to keep your intestines clean and your bodies 'exit route'.....open.

I can't tell you exactly how much fiber is in these muffins but I'm sure it's a lot. It'll get you well on your way to your recommended daily intake.

Start your new year off right with these tasty bran muffins but maybe make sure the bathroom's free first....

Blackberry Bran Muffin
Makes: 20 muffins

1 cup rice bran (can substitute wheat bran)
1 cup wheat bran
2 cup spelt flour (or whole wheat)
1 cup brown sugar
1 tsp baking powder
1 tsp baking soda
½ tsp salt
1 cup low fat milk
1 cup cold coffee
2 eggs
¼ cup oil
¼ cup applesauce
1 tsp vanilla
½ cup berries

Directions:
1. Preheat oven to 350 degrees. Grease about 20 standard muffin tins.
2. In a medium bowl mix together the rice bran, wheat bran, flour, brown sugar, baking powder, baking soda and salt.
3. Make a well in the center and add milk, coffee, eggs, oil, applesauce and vanilla. Stir until just combined - do not over mix. Gently fold in berries.
4. Fill muffin cups 2/3 full and bake for about 15 minutes or until muffins are browned and a toothpick inserted into the centre comes out clean.

Monday, November 22, 2010

Spiced Vanilla Pear Butter


You see how in the picture above the spoon has a heavenly like shine?
That's for real.
That's how good this stuff is.


A sweet senior lady from our church gave my a few boxes of pears earlier in the fall and this angelic spread was a (successful!) attempt to use up the last of those pears.


This was really easy to make. I made a few mistakes (mostly due to laziness) but I think it only enhanced the overall product.


Mistakes like: I didn't peel the pears. 
I know I should've but 7lbs of pears?!? That's a lot of peeling and sometimes I can barely find a sane moment to brush my teeth let alone do unnecessary peeling. Plus who wants to see all those peels go to waste?
 Not me.
So instead I puréed twice, once after the pears were cooked (as instructed) and then again after the spices where added and it had been cooked for about an hour. All this puréeing made it as smooth as.... you guessed it.... BUTTA!


My other hiccup in this pear butter making process happened when I left the stuff unattended for about an hour and surprise, surprise, the bottom started to burn.
Fortunately,
I caught it just in time and something beautiful happened. 

Hot sugar got hotter and became caramel. 
That's when it was elevated to food for the angels.
(So I guess this is caramelized pear butter - but good luck if I can ever do that again.)


Try this out for the holidays.
It's fantastic on toast, pancakes, stirred into oatmeal and great with cheese.
There's just something divine about it.


Spiced Vanilla Pear Butter
Makes: 8 x 8oz jar or 4 pints
Adapted from: GoodLife Eats

7lbs pears (cored and peeled if you want)
½ cup water
zest and juice of 1 lemon
2 cups granulated sugar
3 tsp vanilla extract
2 tsp cinnamon
½ tsp cardamon
¾ tsp nutmeg
juice of 1 orange

Directions:

1. In a large stainless steel saucepan, combine the pears, water, lemon zest and juice. Bring to a boil over medium-high heat. Reduce heat and boil gently, occasionally stirring, for 20 minutes.
2. Working in batches, transfer mixture to a food processor fitted with a metal blade and puree just until a uniform texture is achieved. Do not liquefy. Measure 8 cups of pear puree (I used the excess as Pearsauce).

3. In a clean large stainless steel saucepan, combine pear puree, sugar, orange juice, vanilla, cinnamon, cardamom, and nutmeg. Stir until sugar dissolves. Bring to a boil over medium-high heat, stirring frequently. Reduce heat and boil gently, stirring frequently, until mixture thickens and holds it shape to a spoon and liquid does not separate. ( I cooked it on low heat for about 2.5 hours.)
3. Meanwhile, prepare canner, jars and lids: Wash and rinse the jars in hot soapy water. Drain the jars well of any excess water. Set the screw bands aside - they don't require sterilizing. Place the lids - the flat round portion of the two-piece closures - in a small saucepan, cover with water and bring to a simmer. Don't boil. Keep lids hot until you're ready to use them.
4. Ladle hot butter into hot jars, leaving 1/4 inch head-space. Remove air bubbles and adjust head-space, if needed, by adding more butter. Wipe rim. Center the lid on jar and screw band down until resistance is med, then increase to fingertip tight.
5.Place jars in canner, ensuring they are completely covered with water. Bring to a boil and process for 10 minutes. Remove canner lid. Wait 5 minutes, then remove jars, cool and store.


Monday, October 18, 2010

Pear Custard Pie


Meet dessert #2.

It was a great balance to dessert #1.


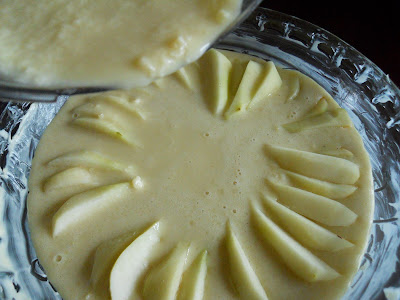
This pear custard pie was incredibly simple to make. The pears are peeled, cored and placed in the bottom of a buttered pie plate and then custard is poured over top and the whole thing is baked for about 40 minutes. How easy is that? 


It's super versatile, too.
Add some cinnamon and apples for a brunch or sweetened whip cream for an after dinner treat.


It has a very light texture and pretty mellow flavour. I'd pair it with a heavier main course like a roast beef or something that you wouldn't want to slap a big piece of cheesecake on to finish.

(I know that's a stretch, thinking of a meal you wouldn't want cheesecake with!?! Change that to a meal you don't have a lot of time to spend on making a dessert.)


Make this effortless pie while pears are in abundance.
You won't regret it!


Pear Custard Pie
Source: Everyday Food Holiday Baking 2007
Serves: 6

3 firm pears
4 tbsp unsalted butter
⅓ cup sugar
⅓ cup flour
2 tsps vanilla extract
3 large eggs
¼ cup milk
¼ tsp salt

Directions:
1. Preheat oven to 350°F. Butter a 9'' pie plate. Peel, core and slice pears into ¼'' pieces. Arrange slices, overlapping slightly.
2. In a blender process butter, sugar, flour, vanilla, eggs, milk and salt until smooth.
3. Pout batter over pears and bake until golden and firm to touch about 40 - 45 mins. Serve warm or at room temperature dusted with icing sugar.

Monday, October 11, 2010

Apple Cranberry Fruit Leather


I'm starting to get tired of apples.
Apple chips, apple donuts, apple juice.... not to mention apple eating.


It's a good thing I got 4 boxes of healthy, blood cholesterol reducing, fibre rich apples. I can't imagine what I would've done with 4 boxes of bacon fat or pickled herring.

Bacon fat chips anyone?
What about some delicious, salty, herring pickle juice?

Just had a flash back to my candy store days.


We used to sell Bertie Bott's Beans. They were/are jelly beans with flavours like toe nails, dirt, earthworm, soap, bacon.
Sounds scrumptious, eh? (Yes, I AM CANADIAN!)


You would not believe the amount of them we sold.
Tons!
And! We sold most of them to adults to give to their unsuspecting children.
How cruel is that?

Be real, could you give this face an ear wax flavoured jelly bean?


Not even on my worst day, in my worst moment would I give her that.
(Actually, come to think of it , yesterday I found her eating dirt out of one of my plant pots so maybe she wouldn't mind it so much.)

Regardless, I am thankful (add it to my other reasons of things I'm thankful for) that I have apples and now some dried apple fruit leather to feed her rather than dried herring leather.


So what was I going to say about the fruit leather?
Oh right.


Cranberries + Apples = Good
Cranberries +Apples + Lemon Juice + Honey = Great
(Cranberries + Apples + Lemon Juice + Honey) ÷ (Dried in an oven or dehydrator)   = AMAZING!


Apple Cranberry Fruit Leather
Makes: 2 9x13 sheets
Adapted from: Eat and Talk originally from Martha Stewart

3lbs assorted apples (for best results mix tart and sweet)
1 cup thawed cranberries
⅓ cup apple juice
2 tbsps lemon juice
3 tbsps honey or agave nectar

Directions:
1. Preheat oven to 200°F. Generously spray two 9''x13'' rimmed baking sheets with cooking spray.
2. Core the apples (you can leave the peel on). In a food processor or blender purée the apples, cranberries, apple and lemon juices and honey. You may need to do this in 2 batches if your blender or food processor isn't big enough.
3. Divide the mixture evenly between the 2 pans. Smooth out the top with an offset spatula. It should be about ¼'' thick.
4. Bake in the oven with the door slightly ajar for 3 -3½hrs or until dry to the touch. It will dry up a bit more as it cools so you don't want to over cook it or it'll turn to 'fruit brittle'. Check the fruit leather every hour or so to make sure the edges aren't browning and rotate the pans. Remove from the oven and let it sit for about an hour until easy to handle.
5. After the leather is removed from the oven cut off any dry or uneven edges and cut and roll up into desired sizes. Keep wrapped in plastic. (I like to refrigerate mine but it's not necessary.) 

Wednesday, September 29, 2010

Apple Chips


Remember how I said I have ten thousand pounds of apples?
(*I exaggerate a lot so please don't take my amounts literally. Thanks.)


Well, I am indeed still figuring out ways to use those apples.

I guess with this many apples it was inevitable that I would eventually be spending my afternoons coring and slicing to make apple rings for the dehydrator.


Side Note: Dehydrators are wonderful inventions. You put what ever you want in, leave them to be for several hours and your perishables are transformed into non-perishables. In this case apples slices are converted into lovely little dried apple chips. Perfect for the ever curious 7 month old to snack on.

Apple chips are for eating, not wholly mammoths!

And now back to the show:
 It took a lot of work to get the apples prepped for the chips but it was worth it!
They're a great healthy snack to eat on the run, they don't have to go in the fridge and they were super cheap to make.

All qualities I admire in my food.


Healthy, convenient and cheap. What's not to love?


Apples Chips

1. Wash apples well. If desired remove the peel. 
2. Core apples and slice horizontally to create an 'apple ring', about ¼'' to ½'' thick.
3. While you are prepping apples, place apple rings into a cold bowl or sink of water with approximately 2 tbsps of salt sprinkled in to prevent apples from turning brown. When you have the desired amount of apple slices, dehydrate according to manufacturers instructions. If you do not have a dehydrator put your oven on low heat (between 130°F and 150°F) and bake for about 3 hours checking often for desired dryness.

Friday, September 24, 2010

Apple Juice


I love the fall. Love it. Love it. Love it.
It makes me want to watch You've Got Mail, my favorite movie ever, while cooking with cinnamon and cloves. 


It also makes me want to preserve. 
And what's the best and cheapest thing to preserve in the fall?

APPLES!
(Especially if they're free apples from the neighbour's tree.)


Since I have about ten thousand apples (I'm exaggerating), and I didn't feel like peeling them I decided to make some juice.

Enter my mom's trusty Mehu-Maija.


This juice extractor is basically a big steamer that catches the juice from fruits or vegetables.
It's a great way to practice 'kitchen recycling'.
You can use any sort of food scrap in it. (In this case apples.)
I threw in apple cores, apple peels, soft apples and bruised apples and it steamed their little hearts.
Think of it as a last stop before the compost.


I know you're probably thinking. "Eww, yuck, I would never do that !"
But seriously, what do you think they make apple juice out of?
It's not the perfectly rounded, beautiful red apples you buy at the grocery store. It's the apples that didn't make the cut. The ones that fell off the tree and were left sad and all alone until someone found them and took the bruised and soft little guys and turned them into something delicious.

True story.


The steaming process is great because it pasteurizes the juice, killing any pesky bacteria that might want to attack you in your sleep. Or when you're awake.
('Cause no one wants to get hit with bouts of diarrhea day or night.)

It's also great because the hot juice is easily preserved by pouring it into scorching hot jars and puttin' on red-hot lids. No processing required and they seal wonderfully.

Tasteless, dry apple mush.

I think the juice is great on it's own or added to some soda for a punch.


Mmmm.... fresh apple juice. The taste of fall!

Monday, September 6, 2010

Apricots in Spiced Rum Syrup


Not too long ago, I bought a giant box of apricots. (They were on sale and you know how I feel about sales .)

I love using local, in season produce. It makes me feel pretty special.
And sometimes a girl just needs to feel special.
The only problem with shopping local and in season is everything looks soooo much better. So instead of buying 3 or 4 apricots I end up with 23lbs of apricots.


So now I ask the question: What the heck am I going to do with all these apricots???


I've made jam, I've canned, I've frozen, I've dehydrated, I've pickled..... Pickled apricots?!?...... I didn't really do that or did I

So what's left to do?

Stumped? Me too.

Until I saw this recipe for nectarines steeped in rum and spices.
I subbed the nectarines for apricots and ..... 
Voilà! 
A way to use up some apricots.


I'm going to let these steep for a least 6 weeks and then maybe use them over ice cream or over Greek style yogurt or use them to fill a tart shell or just eat them out of the jar. 
And probably come mid October, I'll ask myself why I didn't buy more apricots.


WARNING: These will make your house smell like fall and Christmas wrapped in a rummy goodness that will make you want to put up your Christmas tree, start a roaring fire and sing Christmas carols.

I know I did.

Apricots in Spiced Rum Syrup
Makes about 1 quart

6 apricots, sliced in half and pitted
2 cups water
1/2 cup honey plus 2 tablespoons more
1/2 cup spiced rum plus 2 tablespoons more
2 cinnamon sticks
3 star anise
1 vanilla bean, split in half
1 quart or 2 pint glass jars with lids


1. Place halved apricots, water, the 1/2 cup honey and the 1/2 cup rum in a pot with the cinnamon, star anise and the vanilla bean. The apricots should be covered by the liquid. Turn the heat to medium-high and stir so that the honey dissolves completely. Allow to simmer gently for about 1 hour (stir every now and then so that all of the nectarines cook equally).

2. With a slotted spoon, remove the apricots and place in a bowl. If it’s easy to remove the skins, go ahead (feel free to leave them on, though).

3. Put the syrup back on the stove, add the additional 2 tablespoons each of the honey and rum, and allow to boil gently for 10-15 minutes more, so the syrup is reduced and thickened. Remove from the heat.

4. Spoon the apricots into your jar(s). Pour the syrup through a fine strainer over the fruit and discard the vanilla bean and spices. If some of the apricots are not fully immersed in the liquid, add more rum so that they are all covered.

4. Cap tightly and allow to sit in a cool, dark place for at least 6 weeks. These should then be consumed within 6 months.

Directions:

Monday, August 23, 2010

Raw Vegan Power Bars


I try to eat healthy.
 Or at least healthyish .
 I try to get in my 5 - 10 of fruits and veggies and my 30g of fiber.


And my 10g daily dosage of chocolate. 

What?

That's a real thing. I swear I've seen it in the Canadian Food Guide.
I'm sure most women have seen it too.


Or maybe that was just the food guide that I made up for myself.

It's called the Jesse Food Guide and the motto is, "Eat what you want when you want but don't be surprised when you feel like crap."

Tragedy, I know.
(The feeling like crap part, not the eating whatever you want part - that part is golden.)


Let me introduce you to something else that's golden:

"Power Bars meet my readers, made up primarily of my mom and anyone she's told about my blog."
"Readers meet these divine Power Bars."


Packed with fruit, protein, fibre and chocolate, they satisfy my 'food guide' requirements and some of the real food guide requirements. These bars are anything but tragic.

Make them today and let delicious meet nutritious.


Raw Vegan Power Bars
Makes 24
Adapted from: Poems About Food

1 ½ - 2 ripe sliced bananas
½ cup whole almonds
½ cup dried cherries (or any combination of dried fruits)
¼ cup dates
2 tbsp pure dairy free cocoa 
½ tsp cinnamon
½ cup natural peanut butter
¼ cup pumpkin seeds
1 ¼ cups spelt flakes (or rolled oats)

Directions:
1. Put bananas, almonds, cherries, date, cocoa and cinnamon in food processor and blend until fairly smooth.
2. Add peanut butter and mix until uniformly combined.
3. In a large bowl, add the seeds and flakes (or oats) to the peanut butter mixture and mix until oats and seeds are thoroughly coated. (I had to use my hands for this)
4. Press into an 8 x 8 square baking pan and refrigerate overnight. Cut into squares.


Related Posts Plugin for WordPress, Blogger...