Pages

Showing posts with label disaster. Show all posts

Friday, October 22, 2010

Breakfast Pizza Debacle


Have you ever found a chocolate chip on your kitchen counter, stuck it in your mouth and as your biting down realized you haven't baked with chocolate chips in months?

No?

Oh..... um...... never mind then, 
that didn't just happen to me.


I did, however, make this breakfast pizza a few weeks ago.

It's a sore subject but I think I'm finally able to talk about it.


I had planned to make this for a potluck brunch.
I had made homemade pizza dough, bought a few types of cheeses and cooked my bacon to perfection.
 It was going to be so lovely......

Until...... tragedy befell!


Sitting in my oven was a cookie sheet with a silicone mat on top. Unfortunately, I didn't notice it as I put the pizza in and I inadvertently pushed it off the cookie sheet and onto the oven element.

About 5 minutes later I could smell burning and when I rushed to the oven to check it out I was assaulted by melted silicone flying at me.


Have you ever been assaulted by melting silicone?
It's not a pretty thing.

As you might imagine, I was devastated and brought nothing to the potluck.

The End.

It's hard to see but there are tiny pieces of silicone covering my otherwise perfect pizza.

In case you want to try the recipe for yourself despite my debacle, here it is:

Breakfast Pizza
Makes: 2x12'' pizzas

1/2 teaspoon dry active yeast
2 cups plus 2 tablespoons bread flour, plus more for dusting
Kosher salt
6 strips bacon
1/2 cup grated Parmesan
2 cups grated mozzarella
6 large eggs
Freshly ground black pepper
2 tablespoons minced flat-leaf parsley
2 tablespoons minced chives
2 scallions, thinly sliced
1 shallot, minced


Directions:


The night before, prepare the dough: Place 3/4 cup lukewarm water in the bowl of an electric mixer fitted with a dough hook. Sprinkle in the yeast, stir and let sit for 5 minutes. Add the flour and 1 teaspoon of salt and mix on low for 1 minute. Increase the speed to medium and mix for 2 minutes, then increase the speed to high and mix until a smooth dough forms, about 2 minutes more. Turn the dough onto a lightly floured surface, divide into two equal pieces and form each half into a tight ball. Place on a large floured sheet pan, place the pan in a plastic garbage bag, tie the bag loosely and refrigerate overnight.
One to two hours* before baking, place the dough in a warm spot. Adjust the oven rack to the lowest position and set a pizza stone on it. Preheat the oven to 500 degrees 30 minutes before you are ready to bake the pizza.


Prepare the dough and toppings: Fry the bacon in a large sauté pan over medium-high heat until crisp. Cool on a paper-towel-lined plate; roughly chop.
Dip your hands and a ball of dough into the flour. On a lightly floured counter top, pat the dough into a disc with your fingertips, then drape the dough over your fists and carefully stretch it from beneath to form a 12-inch circle.
Generously dust the surface of a pizza peel or large inverted sheet pan with flour and place the stretched dough on it. Sprinkle the dough with half of the Parmesan, mozzarella and bacon. Crack 3 eggs over the top and season with salt and pepper.


Bake the pizza: Shake the pizza peel slightly to make sure the dough is not sticking. Carefully lift any sections that are sticking and sprinkle a bit more flour underneath, then slide the pizza directly onto the baking stone in one quick forward-and-back motion. Bake for 8 to 10 minutes, rotating after 5 minutes. When the crust is golden, the cheese is melted and the egg yolks are cooked, use the peel to transfer the pizza to a cutting board. Sprinkle half of the parsley, chives, scallions and shallot on top. Let cool for 2 minutes, slice and serve immediately. Prepare the second pizza in the same way.

Wednesday, September 22, 2010

The Great Pickle Disaster


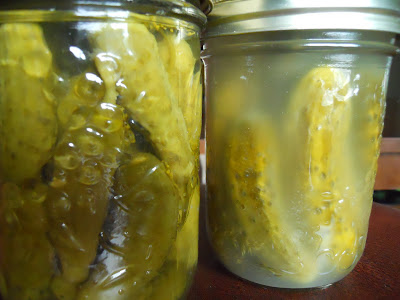
As you can see, we made some pickles.
The cloudy brine doesn't make them look very good, does it? 

So let me tell you about 'The Great Pickle Disaster':


It all started when I decided to buy a huge box of pickling cucs. I thought to myself, "Self, let's make some pickles so we can have them to give away for Christmas or whenever the mood strikes." Self replied, "That's a great idea, Jess''.

So away we went to my mama's house to make some pickles with her.


We packed the cucs in ice to make them extra crunchy. 
We peeled cloves of garlic and bought coarse salt and big heads of fresh dill.
We made a vinegar brine.
We sterilized jars and lids, lids and jars.
We packed the pickles into these jars with dill, garlic, salt and brine and set them aside.

The next day they looked pretty good. A few jars hadn't sealed but that was no problem we'd just redo them.


So away we went. 
We repacked the briny cucumbers in ice. 
We remade the brine and we resterilized the lids and jars, jars and lids.
Then we restuffed all these jars with new garlic, salt, wilty dill, new brine and icy cold cucumbers. 
Then we set these pickles aside.

Then you know what happened?
The original pickles that we thought had sealed started to get all cloudy and ominous and the lids began to pop up. No problem, I suppose....


So away we went (again).
We repacked, remade, resterilized, restuffed and set aside.

And do you know what happened???
(Remember this is the great pickle disaster not just the pickle disaster.)

Those pickles, they turned cloudy. All of them. Every single one.
So our great idea to make pickles? Not going so well. 
Big box of pickling cucumbers = zero, zip, zilch pickles.


 Then we did something smart. 
We enlisted the wisdom of a senior lady from our church (Hi Mrs. Breck!) to aid us in the perils of pickle making.
So away we went.
We repacked shriveled cucumbers in ice.
We made new brine (with 7% acetic acid vinegar).
We resterilized jars and lids, lids and jars.
We restuffed the jars with shriveled cucumbers, salt, brine, garlic and dill and then we processed the jars for 5 minutes and set them aside.

And do you know what happened?!?


Every single jar sealed!
And then over the next few days and even weeks?

None of them turned cloudy.

And the great pickle disaster was transformed to pickle success.

That, my friends, is what happens when you don't process pickles.
Learn from our mistake... PROCESS YOUR PICKLES!

How to Make Pickles (the right way)
*I'm not exactly sure of the amounts here - we used 30lbs of pickles which made about 20 quarts and 6 pints.  I think we used 2 heads of garlic for all those jars and about 6 cups of vinegar*

vinegar
coarse salt
dill
garlic cloves
pickling cucumbers
quarts and pint jars with rings and lids

Directions:

1. Pack cucumbers in ice (preferably overnight). Sterilize jars and lids. We put our jars in a 200°F oven and our lids in boiling water for at least 5 mins.
2. Make brine in a large pot on the stove using a 7:1 ratio of water to vinegar (ex: 7 cups water and 1 cup vinegar). Heat on medium high until it comes to a bowl.
3. Use a pot holder to grab a hot jar from the oven. Add to the jar: salt (for quarts add 1 tsp of salt and for pints add ½ tsp of sal), 1 clove of garlic and 1 head of dill. Stuff jar as full as possible with cucumbers leaving about 1 inch of head space. Add hot brine to the jar until cucumbers are covered. Wipe mouth of jar with a clean cloth and put on lid and ring. Set aside.
4. Continue doing this until you have enough pickle jars to fill a canner. 
5. Fill canner half full of water. Place on stove and fill with jars. Turn heat on medium high and cover. When the canner begins to boil start a timer for 5 minutes. When the timer beeps, carefully remove jars and set to the side undisturbed for at least 12 hours.
6. Pickles are best left to 'pickle' for 6 weeks before enjoying.

Related Posts Plugin for WordPress, Blogger...