Pages

Thursday, October 28, 2010

Chocolate Biscotti


It's time to start thinking of Christmas.
I don't ever stop thinking of Christmas but if you're more normal than me then it's time to start.


I know Halloween is just a few days away and it seems more fitting to be thinking about candy corn and costumes. 
But trust me. 
Christmas is just around the corner. And it never hurts to be extra prepared.


You can go ahead and prepare yourself by cooking up an extra big batch of these biscotti and freezing them.
They'll be a perfect counterpart to the rich, buttery, soft shortbread on your cookie tray.


Or buy a pound of coffee (from Jus Juiced, of course) and pair it with a bag of these beauts for the coffee lover on your list, or the person that's impossible to shop for, or the kids or me..... not really, I already have lots of coffee and biscotti....(sorry, you'll have to get me something else.)


Or just make them for yourself. 
If you don't drink coffee, savour them with a big glass of milk.
Put some vanilla buttercream on them and they're like Oreos grown-up.


But trust me. Christmas is coming sooner than you think.

P.S. I didn't forget the butter in the recipe. Apparently authentic biscotti doesn't have butter. Who knew?

Chocolate Biscotti
Makes about 2 dozen
Source: David Lebovitz

For the biscotti:
2 cups flour
¾ cup top quality cocoa powder
1 tsp baking soda
¼ tsp kosher salt
3 eggs, at room temperature
1 cup sugar
1 tsp vanilla extract
½ tsp almond extract
1 cup toasted almonds, coarsely chopped
¾ cup chocolate chips

For the glaze:
1 large egg
2 tbsp coarse sugar

good quality chocolate, melted for dipping (optional)

Directions:
1. Preheat oven to 350°F. In a small bowl sift together flour, baking soda, cocoa and salt.
2. In a large bowl beat together eggs, sugar, vanilla and almond extracts. Gradually stir in the dry ingredients, mix in nuts and chocolate chips until the dough just holds together.
3. Line a baking sheet with parchment or a silicone mat. On a lightly floured surface, form the dough into 2 logs the length of the baking sheet. Transfer the logs to the baking sheet.
4. Gently flatten the tops of the logs.  Beat the egg and brush generously over the logs (you won't use it all). Sprinkle each log with the coarse sugar and bake for 25 mins or until the dough feels firm to the touch.
5. Remove and allow to cool for 15 mins. On a cutting board use a serrated bread knife to cut the cookies into ½'' slices. Lay the cookies cut side down and return to the oven for 20 - 25 minutes until the cookies feel mostly firm.
6. If desired, cooled cookies can be half dipped in chocolate and left until the chocolate hardens. Store biscotti in an air tight container.

Wednesday, October 27, 2010

Pumpkin Spice Syrup


This is fall flavored syrup.
Just trust me on this.
I don't lie about fall.
Or syrup.


As Buddy the elf once said,
"We elves try to stick to the four main food groups: candy, candy canes, candy corns and syrup."
Of course I'm not an elf but I do have an affinity for elf culture,
so I take my syrup seriously.


This syrup is really yummy.
It's intended to be used to make the infamous pumpkin spice latte but I've only used it on pancakes so far.


It was a little thinner than regular pancake syrup but it still worked well and tasted great.

This whole straining thing didn't work for me. I cooked the mixture too long which made it too thick.

The cloves and nutmeg are definitely the dominate taste so feel free to adjust the spices to your preference.


Happy Fall!

Pumpkin Spice Syrup
Makes: about 1 ½ cups

1 ½ cups water
1 ½ cups sugar
1 tbsp ground cinnamon
½ tsp cloves
½ tsp ginger
1 tsp nutmeg
3 tbsp pumpkin puree

Directions:

1. In a small pot over medium heat, dissolve sugar in water.  Once sugar is dissolved, add remaining ingredients.  Allow to cook for 6-8 minutes, stirring frequently.  Do not boil.
2. Strain mixture using cheesecloth or a tea towel.
3. Pour into a small (8-10 ounce) bottle and store in the refrigerator. 

Linked to: Seasonal Sundays

Monday, October 25, 2010

S'more Cupcakes


Who thought up the expression, "it'll knock your socks off"?
And how did they think up this expression?
Have any of you had your socks knocked off?

I didn't think so.


I've thought it through and I think socks are the most difficult clothing item to knock off.

Knock off my hat.
Knock off my shoulder pads.
Knock off my ear muffs.

But you can't knock off my socks.


Ok, I just got it.

That's why the expression works.

It's impossible to knock someone's socks off so if something's so good........yea.


Have I mentioned that I'm blonde?

Occasionally I fit the stereotype a little too well.

I one time went into a frenzy when we were boarding a plane because I looked out the window and saw another plane moving but I thought that plane was static and it was us taking off. I actually felt dizzy from the 'movement'.

I shouldn't have told that story. I'm a little embarrassed.


Forget my story and try these cupcakes. They'll knock your socks off.

S'more Cupcakes
Makes: 14 - 16 cupcakes
Barely Adapted from Bakerella

Cupcakes
1 1/2 cups all-purpose flour
1 1/2 cups sugar
1 teaspoon baking powder
1 teaspoon baking soda
3/4 cup cocoa
3/4 cup graham cracker crumbs
1 cup milk
2 eggs
2 teaspoons vanilla
1/2 cup oil
7 jumbo marshmallows cut in half, plus more for decorating
Graham Cracker Crumb topping
1/2 cup brown sugar
1/2 cup graham cracker crumbs
1/4 cup butter, melted
Ganache
4 ounces semi-sweet chocolate
1/2 cup heavy cream
1/2 cup butter


1 jar marshmallow cream 
Directions:
1.Preheat oven to 350 degrees F. In a bowl, mix flour, sugar, baking powder and baking soda together with a wire whisk. Separate the mixture in half into two bowls.
2. Stir cocoa into one bowl and the graham cracker crumbs into the other. Add 1/2 cup milk, 1 egg, 1 teaspoon vanilla and 1/4 cup oil to the cocoa mixture and beat on medium until combined. Repeat adding the same ingredients to the graham cracker crumb flour mixture.
3. Prepare the graham cracker crumb topping. Add the brown sugar and crumbs in a small bowl and pour on the melted butter. Stir until combined.
4. Pour a little graham cracker cake batter into the bottom of your baking cups and then sprinkle the topping mixture lightly on the surface. Place a marshmallow half on top and then cover the marshmallow with the chocolate cake batter until it is about 3/4 full. Sprinkle with more topping mixture.
5. Bake cupcakes for about 15 minutes. Place a cookie sheet underneath when you bake just in case. Let cool. 
6. Broil at 400°F 1 jumbo marshmallow per cupcake. You'll need to watch these closely and check them often so they toast and don't burn. Once they're toasted set aside to cool.
7. Heat the butter and cream on the stove. Heat until just before it boils. Remove and pour over chocolate. Stir until completely melted and smooth.
Pour over cupcakes. Add a dollop of marshmallow cream and a toasted marshmallow. Serve immediately. 

Friday, October 22, 2010

Breakfast Pizza Debacle


Have you ever found a chocolate chip on your kitchen counter, stuck it in your mouth and as your biting down realized you haven't baked with chocolate chips in months?

No?

Oh..... um...... never mind then, 
that didn't just happen to me.


I did, however, make this breakfast pizza a few weeks ago.

It's a sore subject but I think I'm finally able to talk about it.


I had planned to make this for a potluck brunch.
I had made homemade pizza dough, bought a few types of cheeses and cooked my bacon to perfection.
 It was going to be so lovely......

Until...... tragedy befell!


Sitting in my oven was a cookie sheet with a silicone mat on top. Unfortunately, I didn't notice it as I put the pizza in and I inadvertently pushed it off the cookie sheet and onto the oven element.

About 5 minutes later I could smell burning and when I rushed to the oven to check it out I was assaulted by melted silicone flying at me.


Have you ever been assaulted by melting silicone?
It's not a pretty thing.

As you might imagine, I was devastated and brought nothing to the potluck.

The End.

It's hard to see but there are tiny pieces of silicone covering my otherwise perfect pizza.

In case you want to try the recipe for yourself despite my debacle, here it is:

Breakfast Pizza
Makes: 2x12'' pizzas

1/2 teaspoon dry active yeast
2 cups plus 2 tablespoons bread flour, plus more for dusting
Kosher salt
6 strips bacon
1/2 cup grated Parmesan
2 cups grated mozzarella
6 large eggs
Freshly ground black pepper
2 tablespoons minced flat-leaf parsley
2 tablespoons minced chives
2 scallions, thinly sliced
1 shallot, minced


Directions:


The night before, prepare the dough: Place 3/4 cup lukewarm water in the bowl of an electric mixer fitted with a dough hook. Sprinkle in the yeast, stir and let sit for 5 minutes. Add the flour and 1 teaspoon of salt and mix on low for 1 minute. Increase the speed to medium and mix for 2 minutes, then increase the speed to high and mix until a smooth dough forms, about 2 minutes more. Turn the dough onto a lightly floured surface, divide into two equal pieces and form each half into a tight ball. Place on a large floured sheet pan, place the pan in a plastic garbage bag, tie the bag loosely and refrigerate overnight.
One to two hours* before baking, place the dough in a warm spot. Adjust the oven rack to the lowest position and set a pizza stone on it. Preheat the oven to 500 degrees 30 minutes before you are ready to bake the pizza.


Prepare the dough and toppings: Fry the bacon in a large sauté pan over medium-high heat until crisp. Cool on a paper-towel-lined plate; roughly chop.
Dip your hands and a ball of dough into the flour. On a lightly floured counter top, pat the dough into a disc with your fingertips, then drape the dough over your fists and carefully stretch it from beneath to form a 12-inch circle.
Generously dust the surface of a pizza peel or large inverted sheet pan with flour and place the stretched dough on it. Sprinkle the dough with half of the Parmesan, mozzarella and bacon. Crack 3 eggs over the top and season with salt and pepper.


Bake the pizza: Shake the pizza peel slightly to make sure the dough is not sticking. Carefully lift any sections that are sticking and sprinkle a bit more flour underneath, then slide the pizza directly onto the baking stone in one quick forward-and-back motion. Bake for 8 to 10 minutes, rotating after 5 minutes. When the crust is golden, the cheese is melted and the egg yolks are cooked, use the peel to transfer the pizza to a cutting board. Sprinkle half of the parsley, chives, scallions and shallot on top. Let cool for 2 minutes, slice and serve immediately. Prepare the second pizza in the same way.

Wednesday, October 20, 2010

Easy Pumpkin Tiramisu


The Sunday morning of Thanksgiving I had a big craving for tiramisu.
And I mean a big one.

So big, in fact, that at 6 am I risked waking up my baby to turn on my mixer to make it.

See, I told you it was big.


It was also strange.
You know why it's so odd that I had a craving for tiramisu?

Hmmm.....
Let's turn this into a multiple choice game. It's strange because:

a) I hate coffee (ahhh.... I can't even pretend to say that!)
b) I don't know what tiramisu is
c) tiramisu makes my skin turn purple and my hair turn orange
d) anytime I come near this dessert I can't stop singing That's Amore


I really wish I could say that tiramisu makes my skin purple and my hair orange.
That would be freakishly cool.
But unfortunately the truth is very boring option b) : I don't know what tiramisu is. Or should I say didn't know.


How does one go through life without knowing what tiramisu is?
I have no idea.
How do I crave it without knowing what it is?
No idea.
I think somewhere deep in my subconscious I knew that I needed to research this dessert ASAP and it needed to join it's friends: Triple Chocolate Pumpkin Pie and Pear Custard Pie on the thanksgiving table.

I think my subconscious was right.

Except there was one little problem.

At 6:00am the grocery stores aren't open and I don't keep mascarpone cheese in my fridge.
Shocking!

So a little online research led me to Martha's easy tiramisu which uses cream cheese, which I did have (yay!) and a half can of leftover pumpkin puree in my fridge inspired this fall friendly pumpkin version of tiramisu.


Enjoy!

Easy Pumpkin Tiramisu
Inspired By: Martha Stewart
Serves: 6


3 tbsps instant espresso powder
8 oz light cream cheese
¾ cup heavy cream
⅓ cup white sugar
1 can (15oz) pumpkin purée
¾ tsp pumpkin pie spice (or ¼ each cinnamon, cloves and nutmeg)
2 pkgs (3oz each) soft lady fingers
cocoa powder for dusting

Directions:


1. In a medium bowl, mix espresso powder with 3 tablespoons boiling water until dissolved. Add 1 1/2 cups cold water; set aside.
2. With an electric mixer, beat cream cheese with heavy cream and sugar until light and fluffy. Add pumpkin puree and pumpkin pie spice and mix for another minute or until completely combined.
3. Spread a few tablespoons of cream-cheese mixture in the bottom of a 2-quart serving dish. Separate ladyfingers. One by one, dip a third of ladyfingers in espresso, then arrange in bottom of dish. Spread with a third of cream-cheese mixture. Repeat twice with remaining ladyfingers, espresso, and cream-cheese mixture (can be refrigerated, covered, up to 1 day).
4. Dust with cocoa just before serving.

Monday, October 18, 2010

Pear Custard Pie


Meet dessert #2.

It was a great balance to dessert #1.


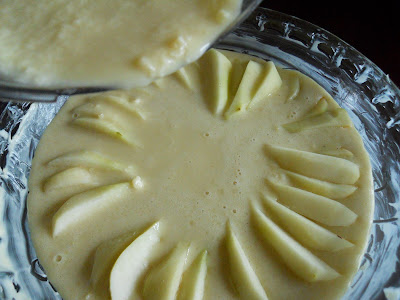
This pear custard pie was incredibly simple to make. The pears are peeled, cored and placed in the bottom of a buttered pie plate and then custard is poured over top and the whole thing is baked for about 40 minutes. How easy is that? 


It's super versatile, too.
Add some cinnamon and apples for a brunch or sweetened whip cream for an after dinner treat.


It has a very light texture and pretty mellow flavour. I'd pair it with a heavier main course like a roast beef or something that you wouldn't want to slap a big piece of cheesecake on to finish.

(I know that's a stretch, thinking of a meal you wouldn't want cheesecake with!?! Change that to a meal you don't have a lot of time to spend on making a dessert.)


Make this effortless pie while pears are in abundance.
You won't regret it!


Pear Custard Pie
Source: Everyday Food Holiday Baking 2007
Serves: 6

3 firm pears
4 tbsp unsalted butter
⅓ cup sugar
⅓ cup flour
2 tsps vanilla extract
3 large eggs
¼ cup milk
¼ tsp salt

Directions:
1. Preheat oven to 350°F. Butter a 9'' pie plate. Peel, core and slice pears into ¼'' pieces. Arrange slices, overlapping slightly.
2. In a blender process butter, sugar, flour, vanilla, eggs, milk and salt until smooth.
3. Pout batter over pears and bake until golden and firm to touch about 40 - 45 mins. Serve warm or at room temperature dusted with icing sugar.

Wednesday, October 13, 2010

Triple Chocolate Pumpkin Pie


This is part 1 of the 3 desserts I made for Thanksgiving dinner.

3 desserts? Seems a little excessive, I know.
But if you know my family you know that we like to eat.
And one option for dessert?
Well, that simply wouldn't do.


I was a little apprehensive about this pie because the comments on the Martha Stewart website ranged from outstanding to terrible.
But in the great spirit of thanksgiving, I decided, "What the heck! At least if it doesn't turn out I won't get stuck eating it all by myself."


Lucky for me, it did turn out!
The first bite was odd with the mix of pumpkin, chocolate and spices. All the flavours seemed to overwhelm my tongue.
The second bite redeemed the first. It was a harmonious blend of sweet and spice.


I only ate a small sliver of pie because, like I said, there were 3 desserts.
Not to worry though, my sister helped with the leftover pie. 


She was probably just being kind eating 3 pieces but..... she's not really that nice.... so....... it must of been a hit in her books.

(P.S. I forgot to drizzle the melted chocolate on at the end so my pie was only a double chocolate pumpkin pie.)

Triple Chocolate Pie
Serves: 8
Source: Martha Stewart Living


For the crust:
2 cups finely ground graham cracker crumbs (about 16 crackers)
3 ounces (6 tablespoons) unsalted butter, melted
1 tablespoon granulated sugar
2 tablespoons packed light-brown sugar
1/2 teaspoon coarse salt
1/2 teaspoon ground cinnamon
3 ounces bittersweet chocolate (preferably 61 percent cacao), finely chopped
For the filling:
6 ounces semisweet chocolate (preferably 55 percent cacao), chopped
2 ounces (4 tablespoons) unsalted butter, cut into small pieces
1 can (15 ounces) solid-pack pumpkin
1 can (12 ounces) evaporated milk
3/4 cup packed light-brown sugar
3 large eggs
1 tablespoon cornstarch
1 teaspoon pure vanilla extract
1 1/2 teaspoons coarse salt
3/4 teaspoon ground cinnamon
3/4 teaspoon ground ginger
1/4 teaspoon ground nutmeg
Ground cloves
1 ounce milk chocolate, melted


Directions:


Make the crust: Preheat oven to 350 degrees. Combine graham cracker crumbs, butter, sugars, salt, and cinnamon in bowl. Firmly press mixture into bottom and up sides of a deep, 9 1/2-inch pie dish. Bake until firm, 8 to 10 minutes.
Remove from oven, and sprinkle bittersweet chocolate over bottom of crust. Return to oven to melt chocolate, about 1 minute. Spread chocolate in a thin layer on bottom and up sides. Let cool on a wire rack. Reduce oven temperature to 325 degrees.


Make the filling: In a large heatproof bowl set over a pot of simmering water, melt semisweet chocolate and butter, stirring until smooth. Remove from heat.
Mix pumpkin, milk, brown sugar, eggs, cornstarch, vanilla, salt, cinnamon, ginger, nutmeg, and a pinch of cloves in a medium bowl. Whisk 1/3 pumpkin mixture into chocolate mixture. Whisk in remaining pumpkin mixture until completely incorporated.
Transfer pie dish to a rimmed baking sheet, and pour pumpkin mixture into crust. Bake until center is set but still a bit wobbly, 55 to 60 minutes. Let cool in pie dish on a wire rack. Refrigerate until well chilled, at least 8 hours (preferably overnight). Before serving, drizzle melted milk chocolate on top. Serve immediately.

Monday, October 11, 2010

Apple Cranberry Fruit Leather


I'm starting to get tired of apples.
Apple chips, apple donuts, apple juice.... not to mention apple eating.


It's a good thing I got 4 boxes of healthy, blood cholesterol reducing, fibre rich apples. I can't imagine what I would've done with 4 boxes of bacon fat or pickled herring.

Bacon fat chips anyone?
What about some delicious, salty, herring pickle juice?

Just had a flash back to my candy store days.


We used to sell Bertie Bott's Beans. They were/are jelly beans with flavours like toe nails, dirt, earthworm, soap, bacon.
Sounds scrumptious, eh? (Yes, I AM CANADIAN!)


You would not believe the amount of them we sold.
Tons!
And! We sold most of them to adults to give to their unsuspecting children.
How cruel is that?

Be real, could you give this face an ear wax flavoured jelly bean?


Not even on my worst day, in my worst moment would I give her that.
(Actually, come to think of it , yesterday I found her eating dirt out of one of my plant pots so maybe she wouldn't mind it so much.)

Regardless, I am thankful (add it to my other reasons of things I'm thankful for) that I have apples and now some dried apple fruit leather to feed her rather than dried herring leather.


So what was I going to say about the fruit leather?
Oh right.


Cranberries + Apples = Good
Cranberries +Apples + Lemon Juice + Honey = Great
(Cranberries + Apples + Lemon Juice + Honey) ÷ (Dried in an oven or dehydrator)   = AMAZING!


Apple Cranberry Fruit Leather
Makes: 2 9x13 sheets
Adapted from: Eat and Talk originally from Martha Stewart

3lbs assorted apples (for best results mix tart and sweet)
1 cup thawed cranberries
⅓ cup apple juice
2 tbsps lemon juice
3 tbsps honey or agave nectar

Directions:
1. Preheat oven to 200°F. Generously spray two 9''x13'' rimmed baking sheets with cooking spray.
2. Core the apples (you can leave the peel on). In a food processor or blender purée the apples, cranberries, apple and lemon juices and honey. You may need to do this in 2 batches if your blender or food processor isn't big enough.
3. Divide the mixture evenly between the 2 pans. Smooth out the top with an offset spatula. It should be about ¼'' thick.
4. Bake in the oven with the door slightly ajar for 3 -3½hrs or until dry to the touch. It will dry up a bit more as it cools so you don't want to over cook it or it'll turn to 'fruit brittle'. Check the fruit leather every hour or so to make sure the edges aren't browning and rotate the pans. Remove from the oven and let it sit for about an hour until easy to handle.
5. After the leather is removed from the oven cut off any dry or uneven edges and cut and roll up into desired sizes. Keep wrapped in plastic. (I like to refrigerate mine but it's not necessary.) 

Friday, October 8, 2010

Cinnamon Pumpkin Hummus


Happy almost Thanksgiving Canada!

Here's what I'm thankful for:


1. I am thankful to be a Canadian. I wouldn't do well in a third world country.
I don't even like to go camping!

2. I'm thankful that I'm a Christian. Again why I don't camp, I hate smelling like smoke.


3. I'm thankful for my family.
Most of the time.
(Jury's still out on a particular brother who never calls me.)


4. I'm thankful for breastfeeding. Seriously, how many times in my life will calories be sucked out of my body. For free!

(Sorry, that was borderline inappropriate, wasn't it?)


5. I'm thankful for relatives with vast DVD collections. It really saves me money. Thanks you guys!

6. I'm thankful for people who are addicted to Jus Juiced coffee.
You all hold a very special place in my wallet heart. 


7. I'm thankful that babies are easily amused. Give the baby a spoon and a face cloth and she's amused for half an hour. Toys are so over rated! 


8. I'm thankful that my family is full of adventurous eaters that'll eat anything.

And I mean anything.
(Except that one time with the baking soda biscuits.....)

Even the baby liked it.

8. I'm thankful that I have another can of chick peas in the cupboard to make this delicious fall snack for the family that eats anything and everything.


Cinnamon Pumpkin Hummus 
Makes about 2 cups 
Adapted from:  Naturally Ella

1 can chick peas (rinsed and drained)
1 cup pumpkin purée
1 tbsp tahini
2 tbsps olive oil
2 tsps cinnamon (add more or less according to your taste)
½ tsp nutmeg
¼ cup pumpkin cooking water or just water (add more if you like a thinner hummus)
salt

Directions:
1. Add all ingredients to food processor or blender and purée until smooth.
2. Add salt to taste. To serve, drizzle with olive oil and freshly ground pepper. Serve with pita wedges or rice crackers.
Related Posts Plugin for WordPress, Blogger...